Nail Your Inner Artist: Picturesque Henna Mehndi Designs That You Can Replicate Today!
Hey there, art enthusiast! Ever looked at those delicate, swirling henna designs and thought, “Wow, I wish I could do that!”? Well, guess what? You absolutely can! Henna Mehndi design, this lovely form of temporary body art, does not require some magical secret only masters may know. It’s a performing art that’s uniquely accessible, deeply rewarding and rich with cultural dimensions.
I like to think of henna as a natural, temporary tattoo. Made from the henna plant, it has been used for centuries to beautify the hands and feet with intricate reddish-brown designs. And believe me, once you enter this world of henna mehndi, you will not exit!
But where do you even begin? No need to panic, we have all the information here. On that note, this guide is not only a wonderful overview and introduction, it is the gateway for you to create your own henna mehndi designs that take your breath away. Let’s unleash your inner artist, shall we?
Simple Henna Mehndi Designs for Beautiful Work, Inspiration for Beginners
Okay, let’s be real. Resembling those super complex, professional designs from the get-go is akin to running a marathon before exercising around the block. So that’s not gonna happen (or at least, not without lots of frustration!). The key is to start simple.
Think fundamental shapes: dots, lines, curves, teardrops and elementary floral motifs. These are all of your building blocks. The more you can fight the urge to overwrite, the faster you can create stylish, clear and memorable designs.
Your First Simple Henna Design – Step-by-Step Guide
Here’s a super simple design that would be perfect for your first attempt:
The Dot Border: Think of a bracelet around your wrist or ankle. Just make a line of tiny dots. And don’t worry if your plastered squares aren’t spaced perfectly — that’s part of the natural imperfection charm!
Arcs: Draw an arc above and another below the dot line in the suggested shape of your wrist/ankle. Think gentle waves.
Teardrop Flowers (Super Easy! ): Now let’s add some really, really simple flowers. Make a small dot. Then around that dot, in the size of petals around the center add five small teardrop shapes —
Fill in the Gaps: If you’re feeling inspired, add some more dots or small curved lines in any blank spots to complete the design.
Before taking this step in real life, make practice on paper! You can practice with the henna cone, get a sense of how the paste flows and what your design is going to look like. It’s so much less stressful than going directly onto your skin.
Top Trends in Henna Mehndi Designs for 2023: All You Need to Know
Similar to fashion, henna mehndi designs also have trends! Keeping up with the latest styles can help your art be fresh and modern. So, what’s hot in the moment?
Minimalist Mehndi: Fine lines, geometric motifs and plenty of negative space. In this trend less is definitely more! It’s so chic and fitting for any occasion.
Arabic Mehndi Designs: Always a classic, Arabic designs are characterized by winding vines, leaves, and striking floral motifs. They are often hands and feet focused and have a beautiful long style.
India Meets Arabia: A blend of the fine detail of Indian mehndi with meandering patterns of Arabian designs is very much in-demand. The best of two worlds — detailed yet graceful.
White Henna (No Actually It’s Not Henna! ): Although it’s not technically real henna (it’s often a skin-safe adhesive that uses white pigment), white “henna” is gaining popularity for its striking, almost lace-like effect, particularly when it comes to bridal designs.
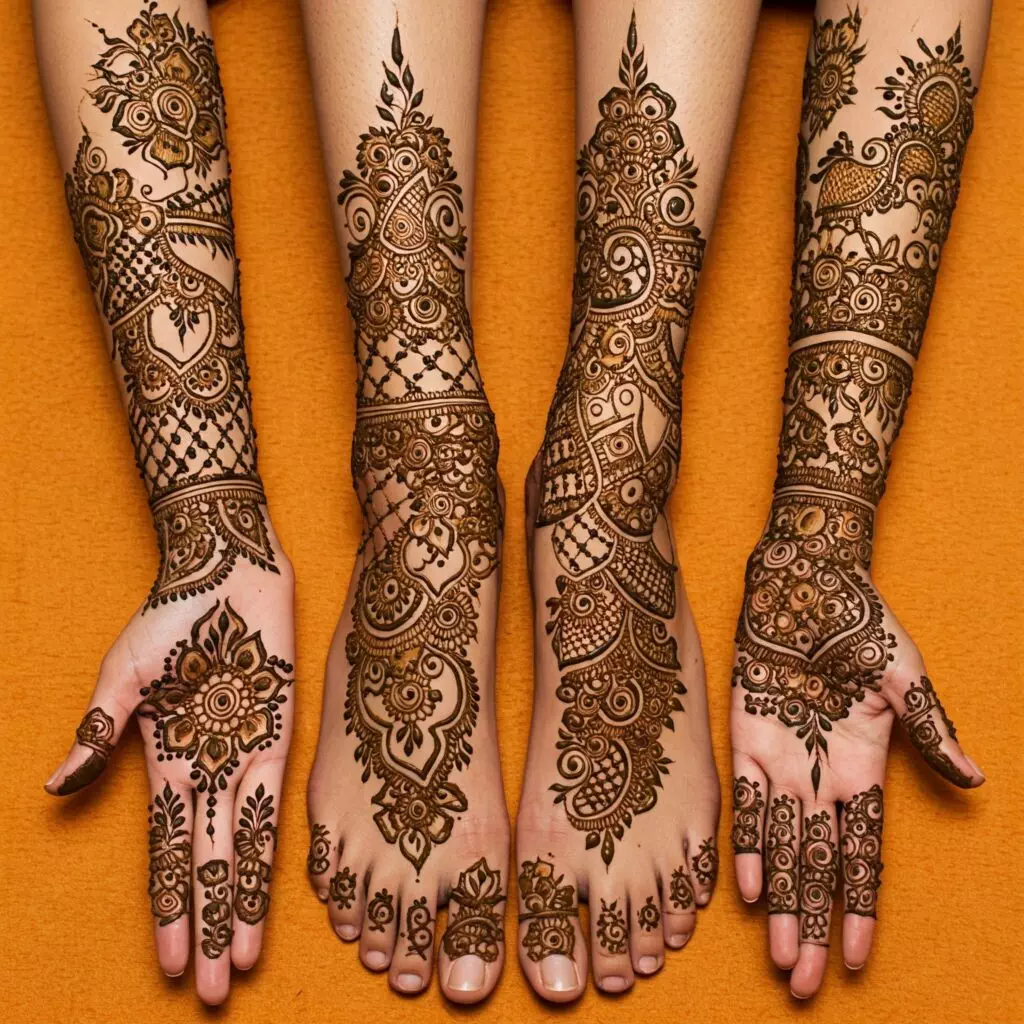
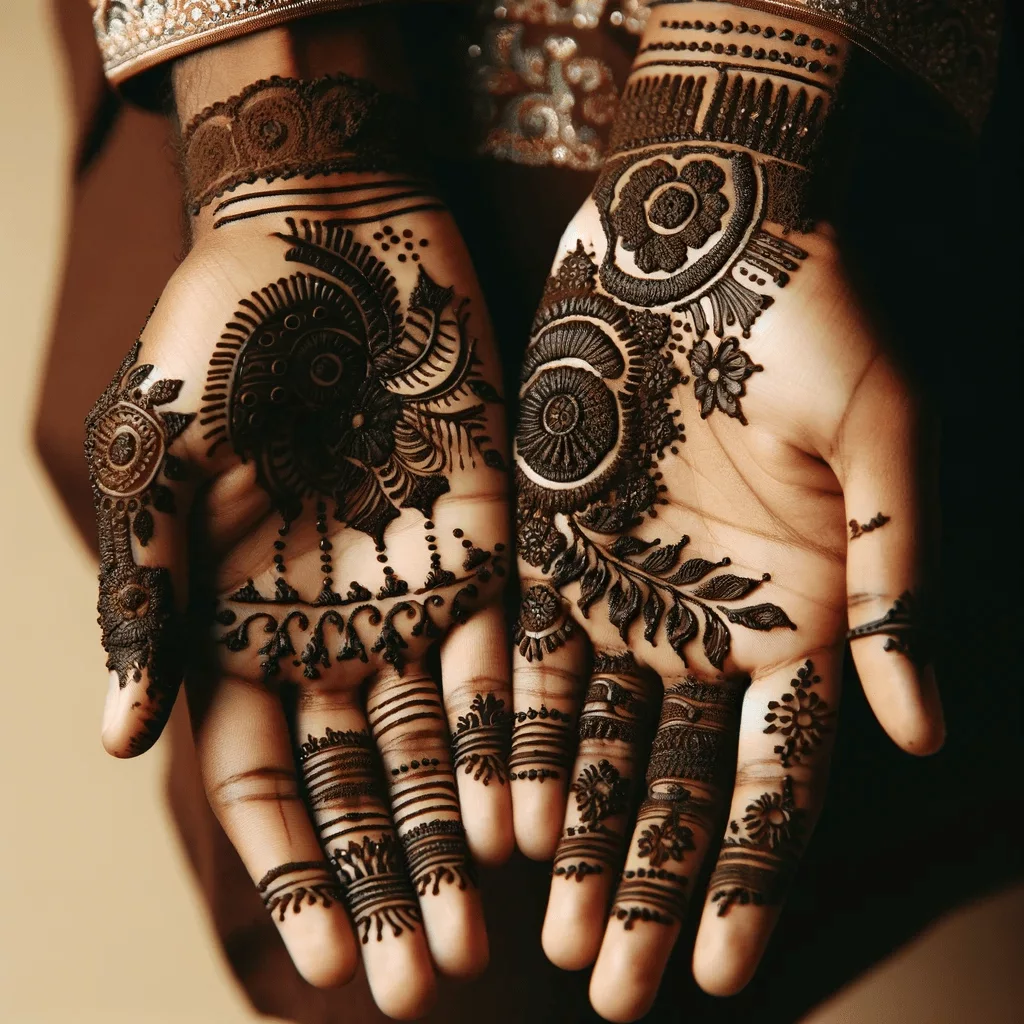
Henna Mehndi Designs for Hands: From Simple to Stunning
Hands — the most common canvas for henna mehndi. Some ideas you might try depending on design complexity:
Simple Hand Designs: (Great for beginners!) Look only at one side of the hand, perhaps only the dorsal or only the palmar side. Simple vines, dots, and basic floral elements do the trick. Think sophisticated and subtle.”
Half-Hand Designs: Half-hand design goes from the wrist to the center of the hand. They are a bit more detailed than simple designs, but doable.
Full Hand Mehendi Designs: If you want to do it with full flair! Full hand designs envelop the entire hand and frequently climb the forearm. These are complex, intricate and often selected for weddings and special occasions.
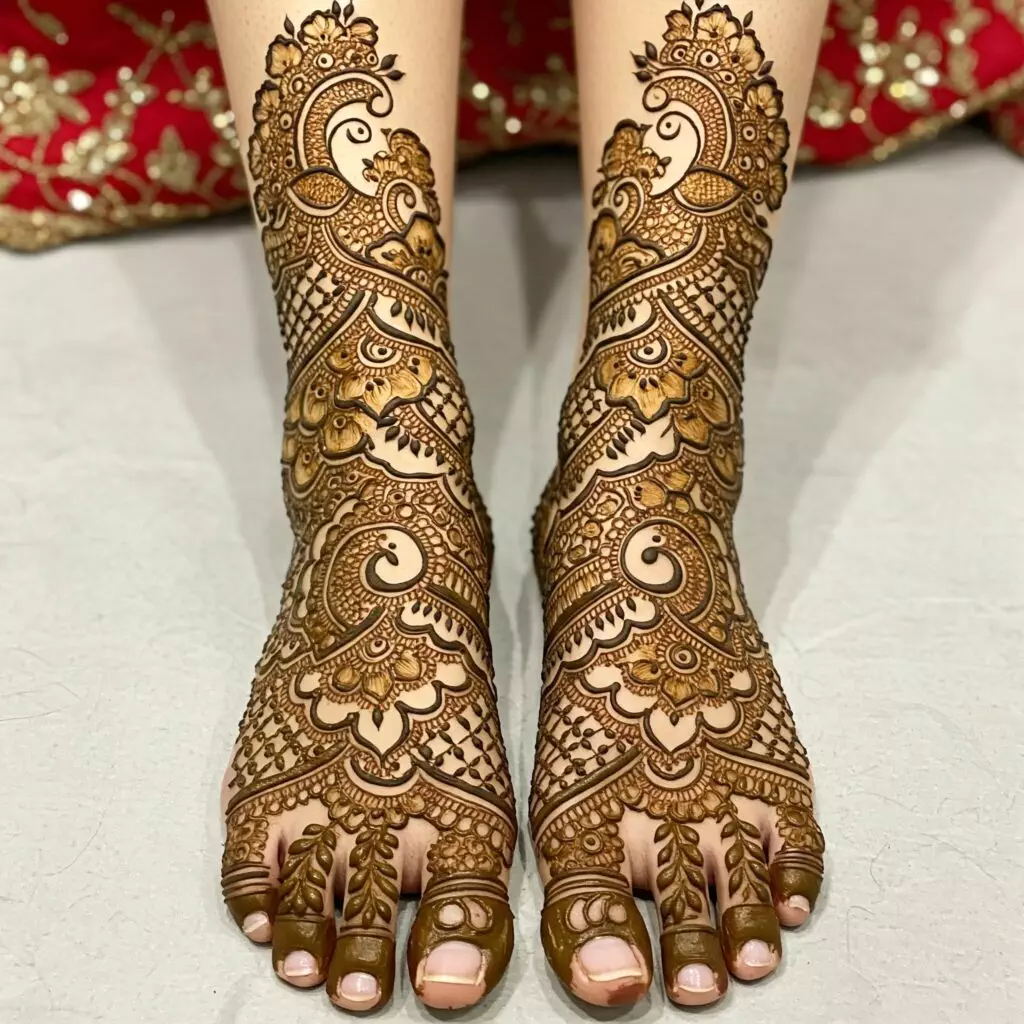
Keywords: Henna Mehndi Designs for Legs & Feet: Anklets & More
Don’t neglect your legs and feet! If you really want mehndi as classy and traditional, then mehendi on feet and legs is the best option.
Anklet Mehndi Designs: Such designs are inspired from an anklet and go around the ankle. They can be straightforward bands of dots and lines or more ornate with professional floral designs.
Foot Mehndi Designs: Like the hand designs, foot mehndi can be simple designs just on the top of the foot, or detailed designs covering the full foot and even going up the leg. Those toe designs are also such a cute detail!
Find your style: Traditional vs. Modern Henna Mehndi Patterns.
Henna mehndi is so traditional, but It’s also growing and changing!
Traditional Mehndi: These are the mehndis that Indian, Pakistani and Arabic brides-to-be have loved for ages and are passed and continued through generations. These typically include paisleys, peacocks, floral motifs and intricate detailing. Decorations are instilled with cultural importance and representation.
Modern Mehndi: Incorporates modern styles such as geometric patterns, abstract styles, and even pulls from other forms of art. Today, mehndi is more about being creative and expressing oneself.
(Analogy Time!) Think of it like music! Traditional mehndi is similar to classical music — timeless and very structured. Contemporary mehndi is the pop or jazz — something fresh, new, and always evolving.” There’s no better or worse, it’s all the things that we’re interested in!
DIY Henna Mehndi: Your Complete Guide
Ready to try it yourself? Awesome! Here’s a quick checklist of what you will need:
Henna Cones — The most convenient option for beginners is to purchase pre-made henna cones. It is important to purchase henna paste that is of good quality. (How about that hypothetical link to “Best Henna Paste Brands for Beginners? Perfect here!)
Visual references: Search around on the web (Pinterest, Instagram are great!), save designs you love. Good starting point for this article (wink wink at me)!
Practice Surface: Paper, glass, or even fruit (such as oranges!) are great for practicing.
Damp Cloth or Wipes: For fixing mistakes (and mistakes will happen, that’s “the way the cookie crumbles”, right!
Citrus-Sugar Sealant (Optional but Recommended): Blend lemon juice with sugar, this will help keep the henna paste hydrated and darken the stain.
DO IT AT HOME: How to DIY Henna, the Step by Step
Prep Your Skin: Wash the area with soap and water and pat it dry. Do not apply any lotions or oils before (703).
Practice Run: Make a quick swirl or two on your practice surface to get a feel for the henna flow.
DRAW YOUR DESIGN: Lightly squeeze the cone and use the henna paste on your skin according to the design you selected. Work slowly and steadily.
Let it Dry (Patience is Key! ): This is the hardest part! Once applied, let the henna paste dry. This could take 20-30 minutes, or a few hours, depending on how thick your paste is and how humid it is. The dryer, the better the stain.
Seal It (Optional but Helpful): Once the henna paste is dry, you can dab at it with your citrus-sugar sealant mixture. Don’t soak it, a gentle dabbing.
Keep it On (Longer the Better): Leave the henna paste on for a minimum of 2-6 hours or even overnight for the deepest, darkest stain. Wrap the area loosely with medical tape or cling wrap (with caution!) to preserve the design and keep the paste moist.
Remove the Paste (No Water! ): Scrape off dried henna paste gently. Do not use water to remove it at first, since water can halt the oxidation process that darkens the stain.
Let It Rest (It’s the Magic Hour! ): If the stain is first light orange, do not be concerned. It’ll oxidize and turn a deep reddish brown in the next 24-48 hours.
Start Your Henna Journey Now!
Then congratulations, you have begun your very first voyage into the magical universe of henna mehndi design. Keep in mind, similar to any art, it takes practice. Don’t be disheartened if your initial efforts are not perfect. It is vital to enjoy your learning journey, play around with various designs and most notably, allow yourself to express your creativity!
")
")
")
")
Simple Mehndi/henna design flower floral

Henna Mehndi FAQs Ever Wondered About? Read On
For how long does henna mehndi last?
Henna stains generally last anywhere from 1-3 weeks, depending on skin type, placement and aftercare.
Is henna mehndi safe?
Natural henna is relatively nontoxic. But watch out for “black henna,” which includes synthetic dyes that can lead to serious skin reactions. Always use natural, brown henna paste from credible sources.
Can I prepare henna paste at home?
Yes! With a little practice, making your own henna paste gives you control over the ingredients. Just type “DIY henna paste recipes” on your search engine, and you will get all the detail you need.
What can I do to get a darker henna stain?
And for those of you who really want to get that dark henna stain — keeping the paste on longer, applying a citrus-sugar sealant and keeping the area warm after removing the paste can all help.
How do I find henna design inspiration?
Pinterest, Instagram and Google Images are great sources for henna mehndi designs. You can look at books or websites specifically for henna art too.
Tips by expert for beautiful henna mehndi designs! A from scratch guide, tips & tricks to make outstanding patterns. Now start your henna journey!